
My better half, absolutely loves chocolate and peanut butter, so for his big five year anniversary in our fellowship, he requested Chocolate Peanut Butter Cake Pops for the big celebration.
I am assuming that whoever coined the phrase “..a match made in heaven” must have meant chocolate and peanut butter, because these are two flavors that seriously boost one another up. But then when you add cake pops to that equation, well you have that match made in heaven multiplied tenfold.
Which brings me to the topic of this particular post which is about how to make Chocolate Peanut Butter Cake Pops, or better yet, how to make awesome, delicious, O.M.G, I can’t stop eating these fantabulous Chocolate Peanut Butter Cake Pops…or maybe that is just me 🙂
I guess the only way to find out, is to make them yourself and be the judge.
 This is what you will need!
- Chocolate cake (prepared)
- Peanut Butter Butter Cream Frosting {RECIPE HERE}
- Chocolate candy melts
- Peanut Butter candy melts (If available)
- Lolly pop sticks
- A squeeze bottle (if you have one)
- Baking sheet lined with wax paper or parchment paper
- Styrofoam or something to stand the pops in as they set (covered in Saran wrap)
Cake pops are seriously simple to make, but do require some patience in between each step, so make sure you have some chunks of time available to you in order to prepare them. I have two children ages 1 & 2, so whatever time I have MUST be used to the best of my ability.
For these cake pops although you can use any cake recipe you wish, to save time I opted for a good old box recipe, but the choice is yours. When your cake has fully cooled, break it up into a bowl until it is finely crumbled. Add in the frosting and mix until it has all been incorporated, it will be very mushy looking. For one 9″ cake round, I used a about 1/3 cup of frosting. A little more can be used, but you do want a nice balance of cake and frosting, and not just all of one or the other.
 When you are done mixing it all, let it sit, for a few minutes before you start rolling it out. I don’t really have a reason why, it’s just what I do:)
 I measure out a heavy Tbsp. for each pop. I have found that measuring also helps to keep the balls roughly the same size. Roll each ball between your palms until you have all your little yummy pops to be, lined up and put them in the fridge for about 20-30 minutes (or more, the longer the better.) This helps to firm them up, so they are easier to dip into the chocolate.
I have found that sticking them in the freezer cuts the time in half, BUT because they are so cold (or frozen) they will form cracks through the chocolate after you dip them. If your just going to be eating them, that may be fine, but if you are making them for a special occasion, you will want keep them in the fridge to set.
 Prior to taking them out of your refrigerator, get you candy sticks ready and start to prepare your chocolate. You can melt your chocolate in one of two ways, using a double boiler or in the microwave, which ever method you prefer is the one you should use. When your chocolate is ready, remove your cake pops from the fridge. Dip one end of the candy stick into the chocolate and push it gently into the cake pop, no more than half way. This helps to mesh the cake to the stick and helps when you dip them into the chocolate.
 If your making a lot of pops, you may want to put them back in the fridge when you are done, just to firm them up again before the big plunge.
 When you are ready to start dipping them, it is very important to have the chocolate be at the right consistency. (This goes for any type of chocolate dipping) If it is not thin enough, you will have big gloppy balls of chocolate and probably have them fall off the stick into the chocolate.
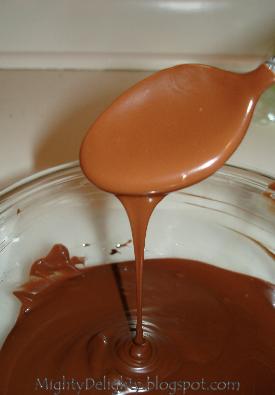 Holding the pop by the stick, dip it into the chocolate straight down. Do not swirl it or “stir” it in the chocolate, you can tilt it in order to get the coverage you need or you can use a spoon. After it is covered pull it straight up out of the chocolate.
Yes, I am doing two at a time, I’m such a showoff 🙂
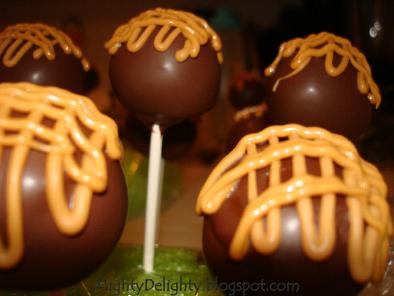
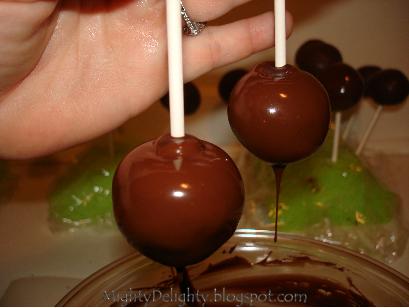 To remove the excess chocolate tap the pop gently on the side of the bowl, rolling it if necessary. Place them into the Styrofoam, so the chocolate can set on the pops. As they are setting, you can begin to get the peanut butter candy melts ready. I broke them up and placed them into a Wilton squeeze bottle I had, melting them in the microwave, with the cap off. When they are at the right consistency (melted) squeeze a squiggly or whatever design you choose over the top of each pop.
If you don’t have a squeeze bottle, you could use a decorating bag with a tip, or a plastic food storage bag with a small piece of the corner cut off, to pipe the melted chocolate onto the pops.
 After you add the first set of lines, you may want to go back over in the opposite direction, to really heap it on. I tend to store the pops in the fridge until I am ready to serve them.
 Hope you try these out and if so, that you enjoy them as much as everyone at my hubby’s celebration did. I would love to hear your feedback, so please do feel free to comment below!
![]()


